메모

 - Spring boot +JSP 사용시 제약이 조금있다. 그래서 가능하면 thymelef 등을 사용하는게 좋음

 - 개인적으로 주변 회사에서는 thymelef를 선호하는 편인듯.. 

 - 나는 Spring boot가 나오기 몇 년전에 FreeMarker를 한참썻는데 이제 쓸데가 없어짐.. 기억도 안나고..(지금 쓰고 있는 JSP도 가능하면 그만 쓰려고 노력 중)


본론으로 들어가서 spring boot 프로젝트의 방향성과 cloud 등에서 embedded servlet container를 선호할수 밖에 없는 제약 등으로 JSP는 이제 그만 사용해야할 듯 함(현재 AWS에서는 JSP를 따로 deploy하고 쓰고 있지만 좋은 방법은 아니고..)


참고


29.4.5 JSP Limitations(링크)

When running a Spring Boot application that uses an embedded servlet container (and is packaged as an executable archive), there are some limitations in the JSP support.

  • With Jetty and Tomcat, it should work if you use war packaging. An executable war will work when launched with java -jar, and will also be deployable to any standard container. JSPs are not supported when using an executable jar.
  • Undertow does not support JSPs.
  • Creating a custom error.jsp page does not override the default view for error handlingCustom error pages should be used instead.

There is a JSP sample so that you can see how to set things up.

[개요]
  1. 가끔 오라클 사이트에서 JDK를 다운로드해서 리눅스 서버에 설치해야하는데 방법을 정리한 내용입니다.
  1. 사전 준비물 : fiddler 또는 크롬 개발자 도구


[방법]
  1. 오라클 사이트에 접속해서 다운로드할 버전 확인
  2. fiddler 또는 크롬 개발자도구를 실행해서 네트웤 캡쳐링
  3. JDK 다운로드 클릭
    1. 일반적으로 centos 64bit계열(회사들에서 많이쓰는)에서는 Linux x64의 tar.gz 버전 설치

  4. 다운로드 URL 확인 후 복사
    1. URL은 짧은시간(ex. 몇분동안)만 유효하니 그전에 wget 등으로 다운로드 함
      1. fiddler를 이용시

      2. 크롬 개발자 도구 이용시


  5. wget 커맨드 생성 후 다운로드 실행
#JDK8 다운로드 wget 커맨드 샘플(일정 시간동안만 URL은 유효함)
wget 'http://download.oracle.com/otn/java/jdk/8u211-b12/478a62b7d4e34b78b671c754eaaf38ab/jdk-8u211-linux-x64.tar.gz?AuthParam=1557104761_2911d9b711b8ff9b7fde6c8470286ce7' -O jdk-8u211-linux-x64.tar.gz


'JAVA > 툴 및 팁' 카테고리의 다른 글

sentry logback(java) 연동 방법  (0) 2021.01.12
pinpoint 설치 방법- 1.8.4 버전  (0) 2019.06.26
nexus 설치 및 셋팅  (0) 2019.03.22
pinpoint 설치 방법- 1.8.1 버전  (0) 2018.12.21
pinpoint 설치 방법 메모  (0) 2017.11.16

참고:  https://github.com/spring-projects/spring-loaded

목적: spring boot로 개발 도중에 was 재 시작 없이 작업 중인 소스코드를 적용하여 생산성 향상


  1.  springloaded 라이브러리를 maven 디펜더시에 추가 

        <dependency>

            <groupId>org.springframework</groupId>

          <artifactId>springloaded</artifactId>

        </dependency>

  1. springloaded jar파일이 로컬 .m2에 저장됨

    1. ex) C:\Users\{계정명}\.m2\repository\org\springframework\springloaded\1.2.8.RELEASE\springloaded-1.2.8.RELEASE.jar

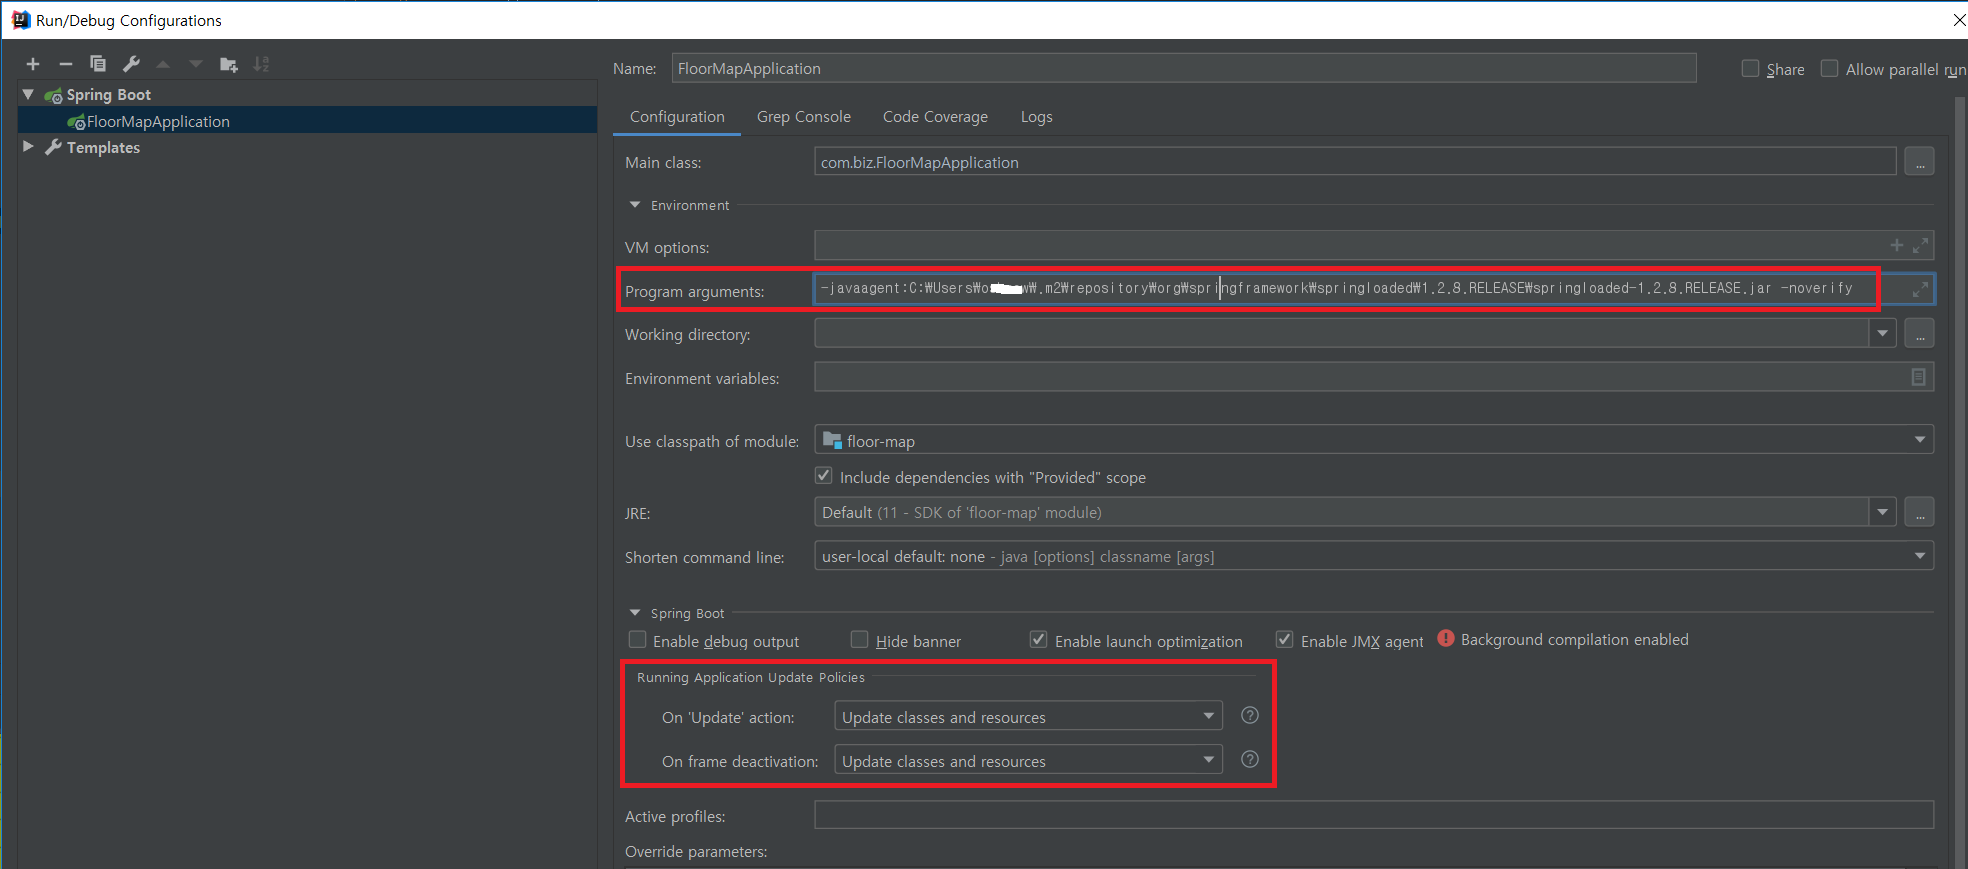
  2. spring boot의 config에서 VM Arguments에 설정

    1. ex) -javaagent:C:\Users\{계정명}\.m2\repository\org\springframework\springloaded\1.2.8.RELEASE\springloaded-1.2.8.RELEASE.jar -noverify

    2. ex) 샘플 캡쳐

  3. 기타 

    1. 버전 및 파일 path 체크

    2. maven에 추가하지 않고, 해당 jar파일만 다운로드해서 사용해도 무방할 듯(프로젝트에 불필요한 라이브러리가 추가되지 않음)


intellij에서는 아래처럼 셋팅


아래 링크를 참고해서 nexus를 설치해봄. 


#설치하기
Centos에 biz라는 계정이 ~/apps 하위에 설치한다는 가정하에 진행

cd ~/apps
wget http://www.sonatype.org/downloads/nexus-latest-bundle.tar.gz --no-check-certificate
tar -xzf nexus-latest-bundle.tar.gz && rm -f nexus-latest-bundle.tar.gz && ln -s nexus-2.14.12-02 ~/apps/nexus


#서비스 등록
sudo su
cp /home/biz/apps/nexus/bin/nexus /etc/init.d/nexus
vi /etc/init.d/nexus 후 아래 내용으로 수정

#NEXUS_HOME=".."
NEXUS_HOME="/home/biz/apps/nexus"
#RUN_AS_USER=
RUN_AS_USER=biz
#PIDDIR="."
PIDDIR="/home/biz/apps/nexus"


#서비스 시작
service nexus start

#재 부팅시 자동 재시작 처리(필요시)
chkconfig nexus on


#시작 여부 확인
ps -ef | grep nexus | grep -v grep
netstat -tnlp | grep java


#접속
http://서버주소:8081/nexus


#설정
admin으로 로그인
기본 ID/PW는 admin / admin123 임

Download Remote Indexed를 True로 변경


2022-10-31 기준으로 업데이트해뒀습니다.
 
  • AdoptoOpenJDK관리 주체 변경에 따른 URL변경 등의 내용 업데이트
  • 참고로 https://github.com/adoptium/temurin11-binaries/releases 에서 필요한 환경에 맞춰서 최신 버전 다운로드
    • 예) 리눅스 64bit 핫스팟이라면 OpenJDK11U-jdk_x64_linux_hotspot_11.0.17_8.tar.gz 다운로드
 

커맨드 예)

#다운로드
wget 'https://github.com/adoptium/temurin11-binaries/releases/download/jdk-11.0.17%2B8/OpenJDK11U-jdk_x64_linux_hotspot_11.0.17_8.tar.gz' -O ~/apps/OpenJDK11U-jdk_x64_linux_hotspot_11.0.17_8.tar.gz
#압축해제
cd ~/apps && tar -xzf OpenJDK11U-jdk_x64_linux_hotspot_11.0.17_8.tar.gz && rm -f OpenJDK11U-jdk_x64_linux_hotspot_11.0.17_8.tar.gz

#심볼릭링크(필요시)
cd ~/apps && ln -s jdk-11.0.7+10 jdk_11

#DNS TTL수정(10초로, 어플리케이션마다 틀려야할 수 있음)
echo 'networkaddress.cache.ttl=10' >> ~/apps/jdk-11.0.17+8/conf/security/java.security


Releases · adoptium/temurin11-binaries

Temurin11 binaries. Contribute to adoptium/temurin11-binaries development by creating an account on GitHub.

github.com


openjdk 11설치 방법 및 기본 설정
  • 유저 home디렉토리/apps 하위에 설치한다는 전제


[설치]
#JDK 다운로드 및 설치(가능하면 adoptopen JDK판 사용)
 
  1. adoptopenJDK 배포판( https://adoptopenjdk.net/releases.html?variant=openjdk11&jvmVariant=hotspot 에서 최신버전 확인 후 설치. 리눅스서버를 예로들면 OS는 Linux, Architecture X64)
    1. 명령어 예)
      1. cd ~/apps && tar -xzf OpenJDK11U-jdk_x64_linux_hotspot_11.0.7_10.tar.gz && rm -f OpenJDK11U-jdk_x64_linux_hotspot_11.0.7_10.tar.gz && ln -s jdk-11.0.7+10 jdk_11
  2. 오라클 배포판(약 6개월만 패치 지원)
    1. cd ~/apps && tar -xzf openjdk-11.0.2_linux-x64_bin.tar.gz && rm -f openjdk-11.0.2_linux-x64_bin.tar.gz && ln -s jdk-11.0.2 jdk_11


[기본설정(튜닝)]
 
1. JAVA DNS TTL 수정
echo 'networkaddress.cache.ttl=10' >> ~/apps/jdk_11/conf/security/java.security
 
# 환경변수 추가
echo 'export JAVA_11_HOME=~/apps/jdk_11' >> ~/.bashrc
source ~/.bashrc
 
#확인 방법
$JAVA_11_HOME/bin/java -version
=> java 11버전으로 나오면 됨
 
 
2. 난수 생성시 필요한 엔트로피 고갈되어 발생하는 문제 처리
원인 : java.security.SecureRandom 클래스는 Linux에서는 기본적으로 /dev/random 을 이용해서 난수를 생성하는데 필요한 엔트로피가 고갈되면 램덤값을 생성하는 로직이 대기하게 되고, 성능에 문제가 생길수 있음
 
해결 방법
- java 어플리케이션 시작시 -Djava.security.egd=file:/dev/./urandom 옵션을 주고 실행해서 해결


apache http client의 타임아웃 관련(기본 값 등) - 버전마다 틀릴 수 있으며 아래는 4.5.3 기준


* 요약 

 - 0으로 셋팅하면 무한이고, 음수로 셋팅하면 OS 시스템의 기본값을 따른다.

 - 리눅스 계열에서 시스템 기본값은 net.ipv4  timeout time wait쪽을 살펴보면 되는 것 같음


[참고 - 소스]


 /**

     * Determines the timeout in milliseconds until a connection is established.

     * A timeout value of zero is interpreted as an infinite timeout.

     * <p>

     * A timeout value of zero is interpreted as an infinite timeout.

     * A negative value is interpreted as undefined (system default).

     * </p>

     * <p>

     * Default: {@code -1}

     * </p>

     */

    public int getConnectTimeout() {

        return connectTimeout;

    }

/**

* Request Checker

*  - Redirect

*

* @param modelAndView

* @return

*/

private boolean isRedirect(ModelAndView modelAndView) {

return modelAndView.getView() instanceof RedirectView || modelAndView.getViewName().startsWith("redirect:");

}

  •  요약
    • G1 GC worst-case에서 향상 목적
    • JDK9부터 기본 GC가 G1으로 변경되었는데, concurrent GC에서 full GC가 발생 할 수 있음. 
    • G1 GC의 알고리즘 mark-sweep-compact를 병렬로 수행하도록 변경되었으며 -XX:ParallelGCThreads 옵션을 사용해서 스레드 수 조정 가능


JEP 307: Parallel Full GC for G1

Owner Stefan Johansson
Type Feature
Scope Implementation
Status Closed / Delivered
Release 10
Component hotspot / gc
Discussion hotspot dash gc dash dev at openjdk dot java dot net
Effort M
Duration M
Reviewed by Mikael Vidstedt
Endorsed by Mikael Vidstedt
Created 2017/01/17 11:40
Updated 2018/03/29 07:39
Issue 8172890

Summary

Improve G1 worst-case latencies by making the full GC parallel.

Non-Goals

Match the performance of the parallel collector's full GC for all use cases.

Motivation

The G1 garbage collector was made the default in JDK 9. The previous default, the parallel collector, has a parallel full GC. To minimize the impact for users experiencing full GCs, the G1 full GC should be made parallel as well.

Description

The G1 garbage collector is designed to avoid full collections, but when the concurrent collections can't reclaim memory fast enough a fall back full GC will occur. The current implementation of the full GC for G1 uses a single threaded mark-sweep-compact algorithm. We intend to parallelize the mark-sweep-compact algorithm and use the same number of threads as the Young and Mixed collections do. The number of threads can be controlled by the -XX:ParallelGCThreads option, but this will also affect the number of threads used for Young and Mixed collections.

Testing

  • Full GC time analysis to ensure that the full GC times have improved. Looking at benchmark scores will probably not be good enough since G1 is designed to avoid full GCs.
  • Runtime analysis using VTune or Solaris Studio Performance Analyzer to find unnecessary bottlenecks.

Risks and Assumptions

  • The work is based on the assumption that nothing in the fundamental design of G1 prevents a parallel full GC.
  • The fact that G1 uses regions will most likely lead to more wasted space after a parallel full GC than for a single threaded one.

+ Recent posts